Build React forms with Gatsby
In this guide, we'll show you how to quickly add a contact form to your Gatsby project and connect it to Basin.
Basin is a no code form backend that pairs nicely with static site generators, jamstack tools and frontend development frameworks like Gatsby.
Gatsby is a popular full-stack frontend framework that allows you to create lightning fast static websites built on React and GraphQL. It's great for integrating different content, APIs, and services into a single web experience.
By following this guide, you'll have a working contact form on your Gatsby static website that sends you email notifications when people submit.
Requirements
You'll need a Basin account, which you can create for free here, and a web project built with Gatsby. If you don't already have an existing Gatsby project, we'll go through the process of creating a sample project and contact form in the steps that follow.
If you’re not familiar with Gatsby or how it works, be sure to check out the official documentation to learn more before getting started.
Step 1 — Create a new Gatsby project
Let's setup a project by following Gatsby's Quick Start documentation. In your terminal, run the following command to create a new site:
npm init gatsbyThe CLI will prompt you with a few questions to configure the desired project information and setup. Once everything is installed you will see a terminal message with instructions for navigating to your site and running it locally.
Go to the new directory for the new website:
cd your-folder-nameStart the web server locally:
npm run developNavigate to http://localhost:8000 in your browser and you should now see the sample site with the following screen:
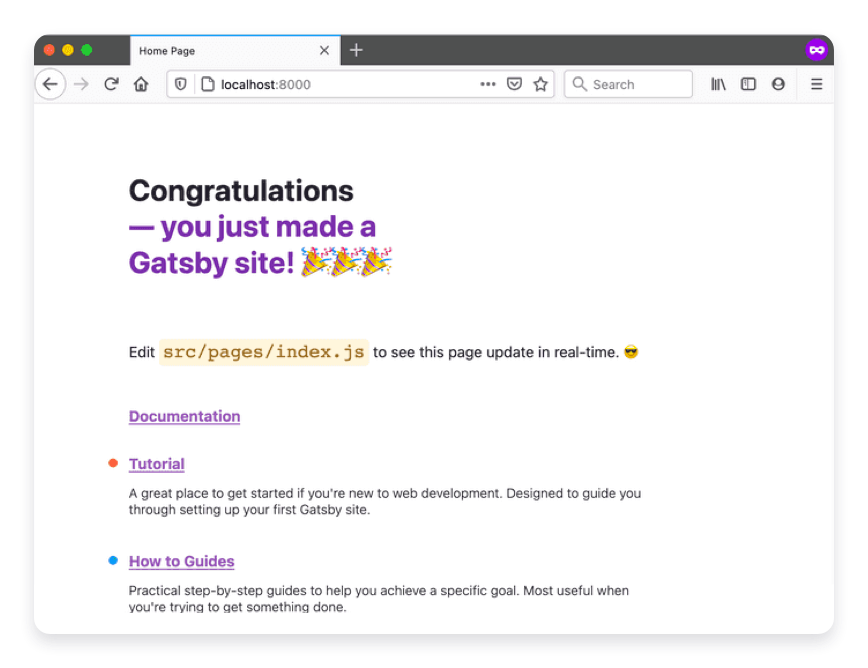
Voila! You just created a new Gatsby site. Nice work! Next, we'll look at how to add a contact form to the project.
Step 2 — Create a Contact Form
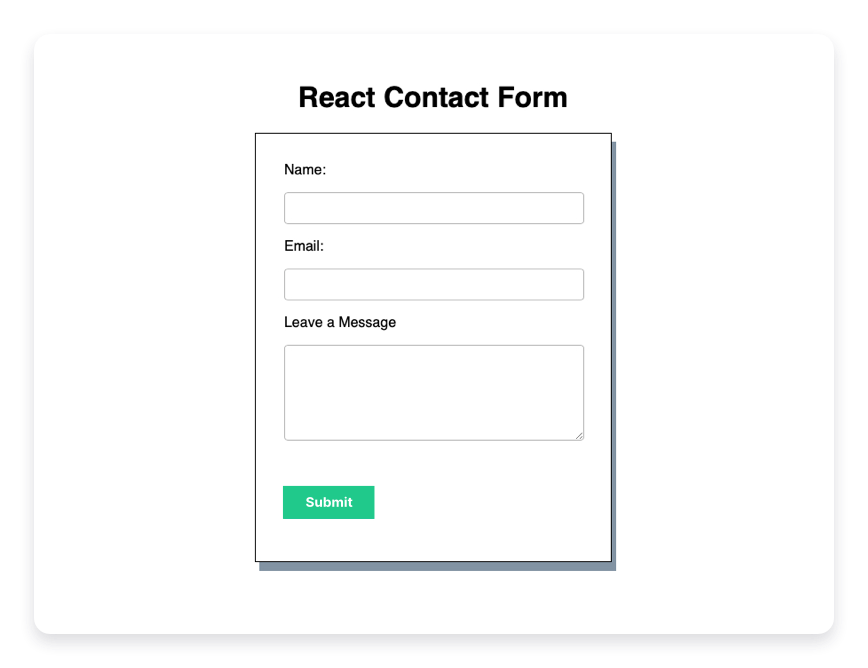
Create a new file called contact.js in the src/pages directory and add the following code block in the file:
import * as React from “react”;
import “./contact.css”;

const Contact = () => {
  return (
    <main>
      <title>Contact Page</title>
      <h1>Basin Contact Form</h1>
      <form action=“” method=“POST”>
        <label htmlFor=“name”>Name: </label>
        <input type=“text” name=“name” id=“name” required />

        <label htmlFor=“email”>Email: </label>
        <input type=“email” name=“email” id=“email” required />

        <label htmlFor=“message”>Leave a Message </label>
        <textarea id=“message” name=“message” rows=“5" cols=“33” />

        <button type=“submit”>Submit</button>
      </form>
    </main>
  );
};

export default Contact;
Note the use of the [name] attribute on the input elements. When creating a new form endpoint, this attribute is required on each input. This allows for the proper association between the name and input value when the form data is submitted.
Optionally, you can create a second file called contact.css in the same directory add whatever custom CSS styling you'd like to give your new React form some pizazz.
In Gatsby, any React component defined in src/pages/*.js automatically becomes a page, so you can now navigate to http://localhost:8000/contact or refresh to view the form in the browser.
Step 3 — Create a Form Endpoint in Basin
After logging in to your Basin account, you can create a new form endpoint from the Forms index page. Simply fill out the fields and click “Create Form”. You'll use this same process for every form endpoint you create.
After your new form endpoint is created, it will appear in the My Forms list. Select it to view the Submissions page, where you can see the inbox, check form performance analytics, and access additional features like integrations, mailer settings, etc.
You'll also notice a form endpoint URL located on the right side of the screen under the sub navigation. Copy this URL, as you will use it in the next step to link Basin to the new contact form in your Gatsby project.
Step 4 — Connect Basin to your Contact Form
Now that you have created a new form endpoint in Basin, you can wire it up to be used in the contact form created earlier.
Open up the src/pages/contact.js file and paste the form endpoint URL into your form’s [action] attribute as shown in the updated code below:
import * as React from “react”;
import “./contact.css”;

const Contact = () => {
  return (
    <main>
      <title>Contact Page</title>
      <h1>Basin Contact Form</h1>
      <form action=“https://usebasin.com/f/<YOUR_FORM_ID>” method=“POST”>
        <label htmlFor=“name”>Name: </label>
        <input type=“text” name=“name” id=“name” required />

        <label htmlFor=“email”>Email: </label>
        <input type=“email” name=“email” id=“email” required />

        <label htmlFor=“message”>Leave a Message </label>
        <textarea id=“message” name=“message” rows=“5" cols=“33” />

        <button type=“submit”>Submit</button>
      </form>
    </main>
  );
};

export default Contact;
In order for your form to submit to Basin, the <YOUR_FORM_ID> in your form code needs to match the ID of your Basin form.
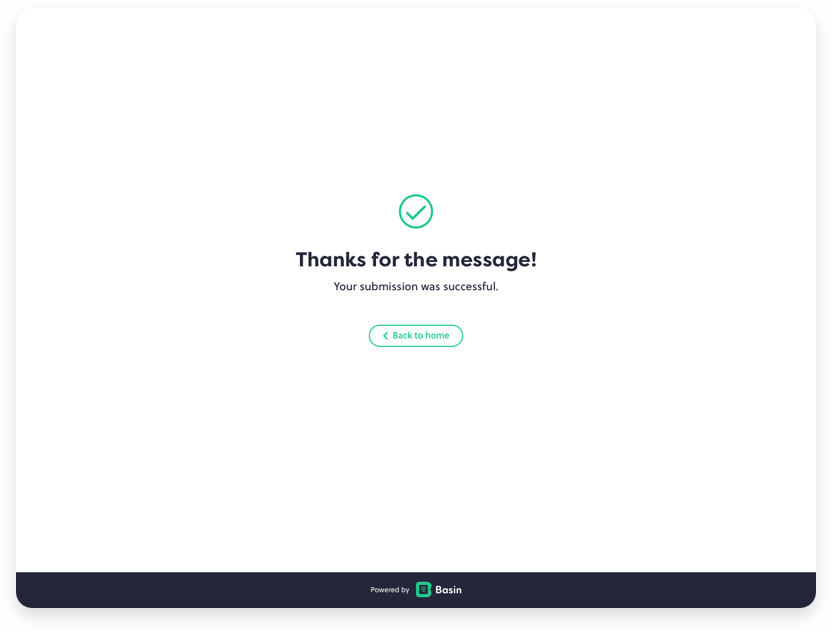
And that's it! Now after filling out and submitting the form you should see the default submission success page displayed.
In addition, after submitting you should see a new message in the forms inbox when viewing your form's Submissions tab in Basin.
Congrats! Basin is now powering the contact form on your Gatsby site!
Bonus — Additional Features
You've learned how to setup a basic form endpoint using Basin, and now you want to take it to the next level. Basin is jam packed with advanced features that allow you to customize the form experience even further.
Here are a few of the many cool things you can setup with your Basin forms:
- Spam Filtering with Honeypot, Google reCaptcha, and domain restrictions.
- Integrations with some of your favorite apps like Zapier and Webflow.
- Analytics to measure form performance and conversion rate tracking.
- Custom Redirects to send people to your own thank you page after submitting.
- Auto-response emails with the ability for branding and message customization.
Check out our Plans and Pricing for a full breakdown of features to see how Basin can add value to your workflow and grow with your needs.
Conclusion
In this guide, you learned how quick and easy it is to get a Basin form backend up and running on your Gatsby site. To learn how Basin works with other jamstack frameworks, static site generators, and CMS platforms, check out our other step-by-step installation guides.
Thanks for reading, and happy form building!
Have questions or need help with something specific? Read the docs or get in touch.